This page describes some of the basic concepts of Kunquat to help get you started. This is not a step-by-step tutorial: rather, my aim is to give you some ideas to try out so that you are better equipped to learn things on your own. At any given point, I encourage you to try out things different from what I suggest. If Kunquat crashes, let the authors know by following instructions in the crash dialog.
WARNING: Kunquat offers many flexible ways to control sounds. As a result, you may sometimes accidentally create sounds much louder than you expect. Please keep your volume levels moderate, especially when editing instruments.
Contents
- Basic notation
- Basic instrument configuration
- Musical expression
- More topics to be introduced later
1. Basic notation
This section describes the basics of writing notation in Kunquat Tracker.
1.1. Controls, notes and rests
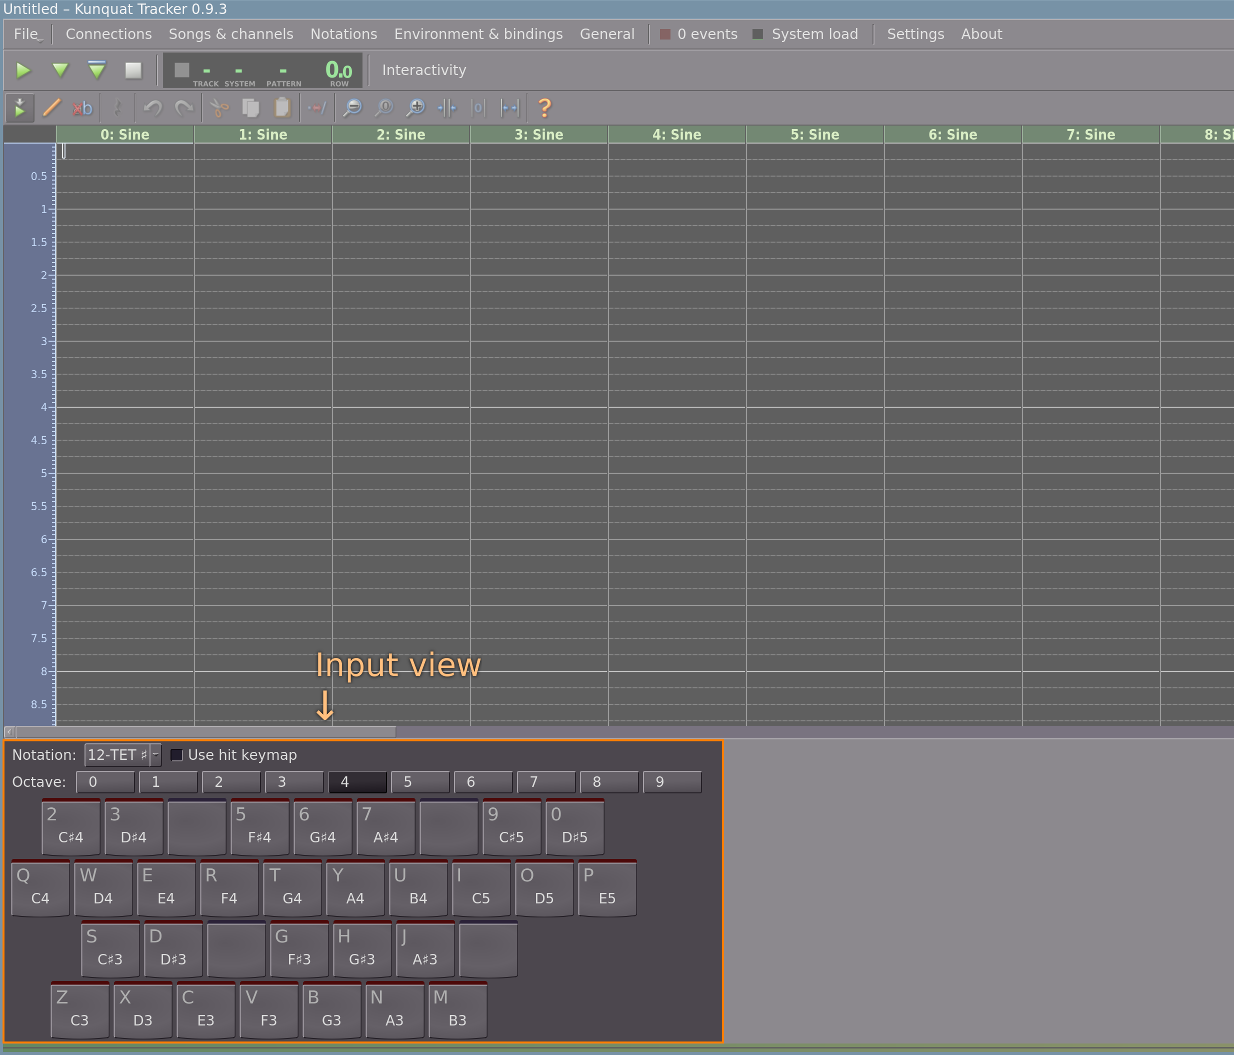
When you first start Kunquat Tracker, you will see an input view at the bottom of the main window. The four rows of large buttons represent your keyboard, and you can press either the buttons on the screen or the corresponding keys on your keyboard to play notes.
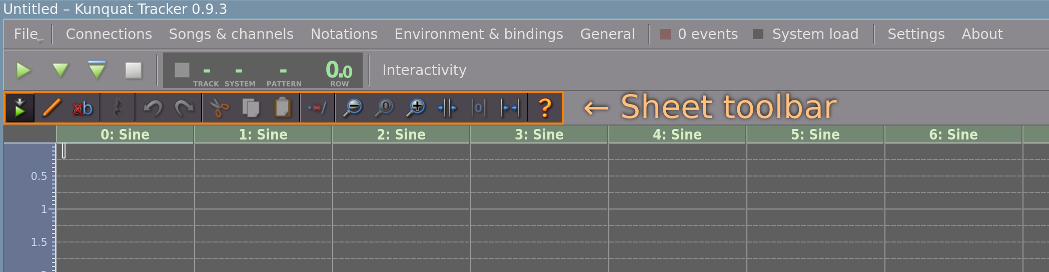
Take a look at the sheet toolbar above the notation view in the main window. This toolbar contains most of the tools required for editing your musical score. Hover your mouse over the tool buttons and you will find that many of them have keyboard shortcuts that you will probably find useful.
Pressing the Edit
![]() button
activates the editing mode, which allows you to enter notes
into the sheet. After you have entered some notes, press the play button
to hear what you entered. You can add rests by pressing 1
(on most keyboards; the rest key is always located at the top
left-hand corner of the note input keys).
button
activates the editing mode, which allows you to enter notes
into the sheet. After you have entered some notes, press the play button
to hear what you entered. You can add rests by pressing 1
(on most keyboards; the rest key is always located at the top
left-hand corner of the note input keys).
If you need to remove anything you add into the sheet, you can use
Delete and Backspace like in typical text
editors. Also, you will find the Replace
![]() mode very
useful, as it allows you to replace existing notes with new ones
directly.
mode very
useful, as it allows you to replace existing notes with new ones
directly.
1.2. Longer compositions
After playing around with adding notes for a while, you will soon reach the end of composition space. Initially, the default empty composition contains one pattern, which is a short section of music intended to contain a few bars of music, usually enough for a musical phrase or two.
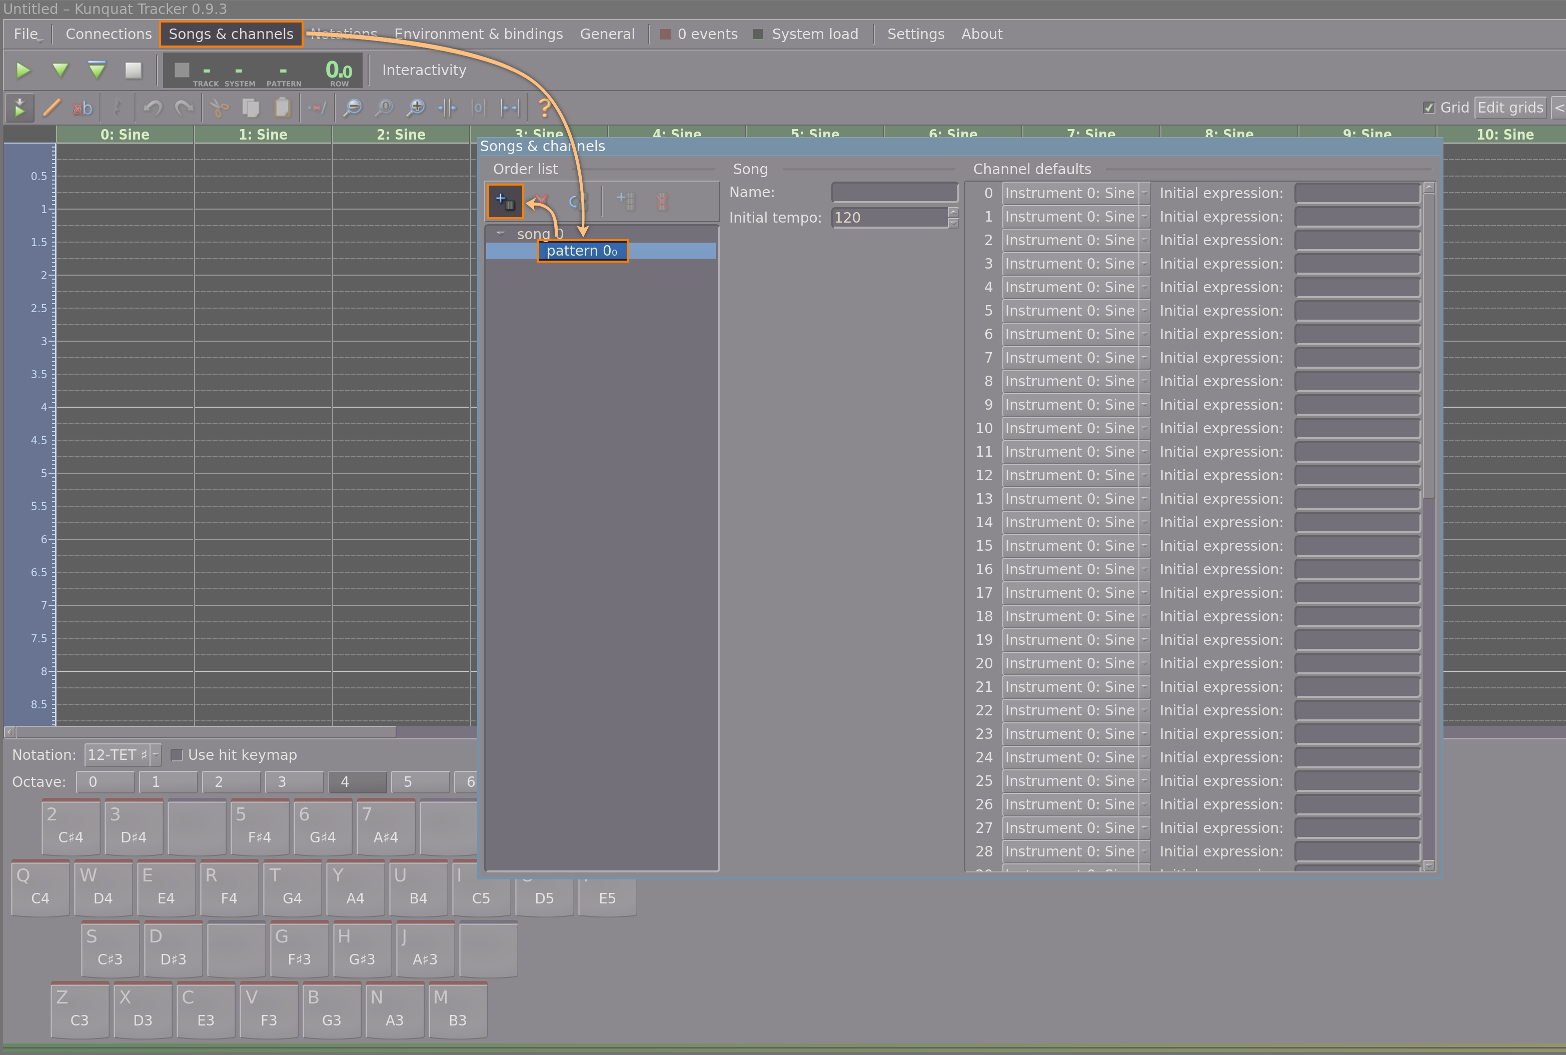
While you can increase the pattern length above the top right-hand corner of the sheet, it is usually more appropriate to organise your composition into several patterns. This allows you to freely change the order in which patterns are played, and you can also reuse existing patterns. Open the Songs & channels window from the top of the main window and take a look at the Order list section on the left. This is where you can manage your set of patterns.
1.3. Tempo, time axis and grids
Take a look at the time axis on the left side of the sheet. The numbers along the axis represent beats. By default, the tempo of a Kunquat composition is 120 beats per minute; therefore, the playback cursor moves forwards two beats every second. You can adjust the default tempo in the Songs & channels window.

While Kunquat does not have a concept of time signatures, it can
represent them with grids. A grid is a set of lines that your
cursor will snap into in the sheet. If you look at the sheet in its
initial state, you can see that the default grid repeats
every 4 beats, and each beat is further divided into 4
subdivisions. Thus, the default grid is suitable for
representing basic rhythms in 4/4 time with up to a 1/16th note in
precision. Try zooming in
 a step or two, and
the display reveals another set of lines, allowing you to
use 1/32nd notes.
a step or two, and
the display reveals another set of lines, allowing you to
use 1/32nd notes.
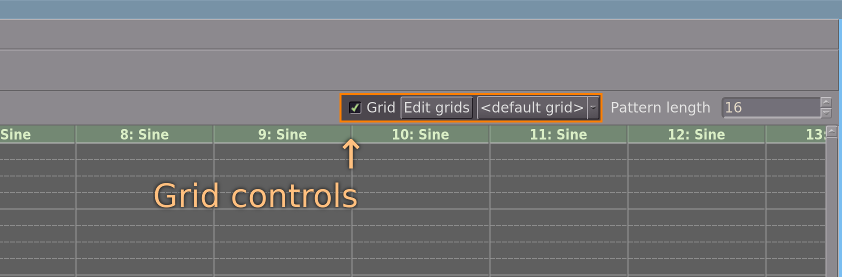
If you need a time signature other than 4/4 or you need a different subdivision of your bars (e.g. for entering triplets), you have two options: either disable the grid feature entirely by unchecking the Grid checkbox, or create your own custom grids. You can access both methods at the grid controls on the right side of the sheet toolbar.
Disabling the grid allows you to enter your notes freely on the time axis, which can help you add a sense of human element or groove into your music. If you are comfortable with the gridless editor, you can safely skip the rest of this section.

If you wish to create your own grids, press the Edit grids button to open the grid editor. After creating a new grid, you have a grid pattern that is equivalent to the default grid. You can adjust the length of the grid to match the number of beats you want in a single bar. You can remove any line except the first one by selecting the line and pressing Delete. You can add new lines by subdividing regions between existing grid lines. Select the line above the region you want to divide, then choose how many parts you want and what line style you want to use for splitting the region. Finally, click Subdivide (or press Insert).
After creating your own grid, you can use it by placing the sheet cursor in the pattern of your choice and selecting your grid from the drop-down menu in the grid controls. This will change the default grid of the pattern. If you only want to use your grid in a specific area, select the area by dragging with your mouse (or by using Shift + arrows on your keyboard) and then select the grid. This is especially useful if you want to add precise triplets or other subdivisions of time.
Note: If you cannot see some of your grid lines in the sheet, it is likely because they are considered to be so close to other lines that showing them would cause cluttered display. Take a look at the “Show lines —— when spacing is ≥:” setting in the grid editor. Select the kind of line you need to make visible and then reduce the value (that is 0.6 by default) until you can see the lines in the sheet.
2. Basic instrument configuration
Soon you will probably want sounds more interesting than the default sine wave instrument. This section will help you add a bit of variety into your instruments.
2.1. Main connection graph
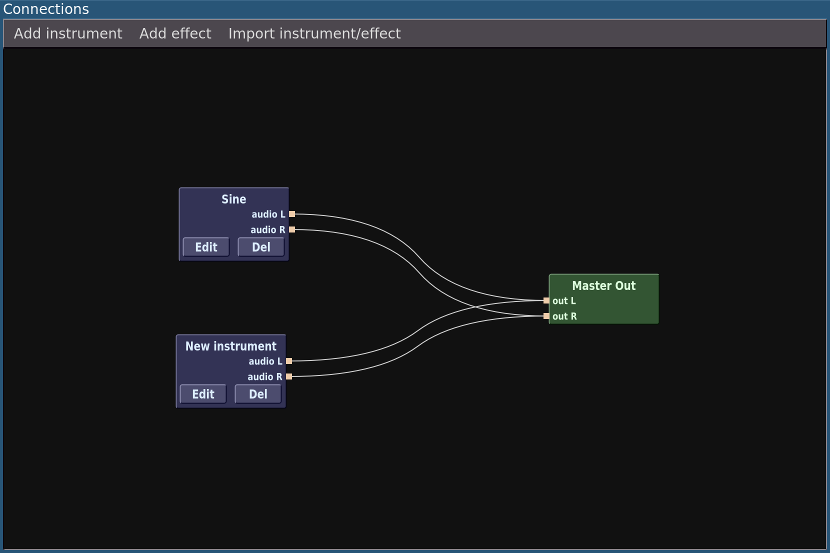
Open the Connections window from the top of the main window. This window shows your instruments (later, also effects) and the way their audio signals are connected. You can think of it as analogous to the way you connect electric instruments to amplifiers and effect units with cables. The Master Out box produces the final audio output, and any sound you want to hear needs to reach this destination either directly or through effect boxes.
If you started Kunquat Tracker normally without opening an existing composition, you will see an instrument labelled “Sine” that is connected to Master Out by two cables. Add a new instrument with the appropriate tool button at the top of the connections view, and you will get a new instrument. The new instrument should be connected to Master Out automatically; if not, connect that instrument as well by dragging cables from the instrument output ports to the corresponding ports of Master Out.
If you need to remove a connection cable, click the cable and select Remove from the context menu.
2.2. Instrument connection graph
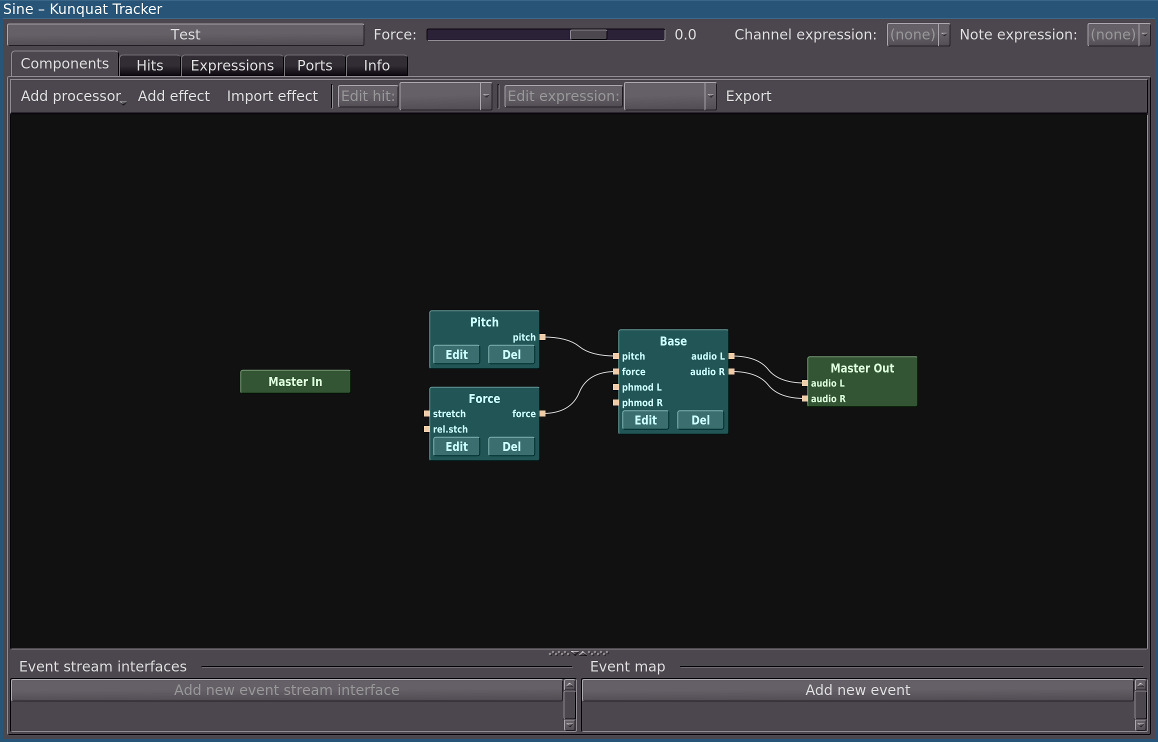
If you press the Edit button of the new instrument you created, you will find another connection view. These are the internal components your instrument uses to make its sound. The instrument also has a Master Out box, and any sound that the instrument makes needs to travel to this destination one way or another. The basic components that generate and/or manipulate sound inside instruments are called processors.
The structure of the connection graph inside the instrument is similar to the one in the higher level. However, not all the components handle audio signals. Take the processor labelled “Pitch”, for instance: its output is the pitch of whatever note is playing. The output of the Pitch processor is connected to the pitch input of the processor labelled “Base”, which is the component responsible for creating the audio waveform. Try disconnecting the cable that connects to the pitch input of Base, and you will notice that all the notes that come out of the instrument now have the same pitch (Reconnect the pitch signal by dragging a cable from the source port to the destination port with your mouse).
2.3. Force envelopes
The processor labelled “Force” is responsible for controlling the volume of the notes produced by the instrument. It is also responsible for keeping the notes alive, so all instruments need a force processor. Try disconnecting the signal travelling into the force input of Base, and you will notice that the instrument no longer makes a sound.
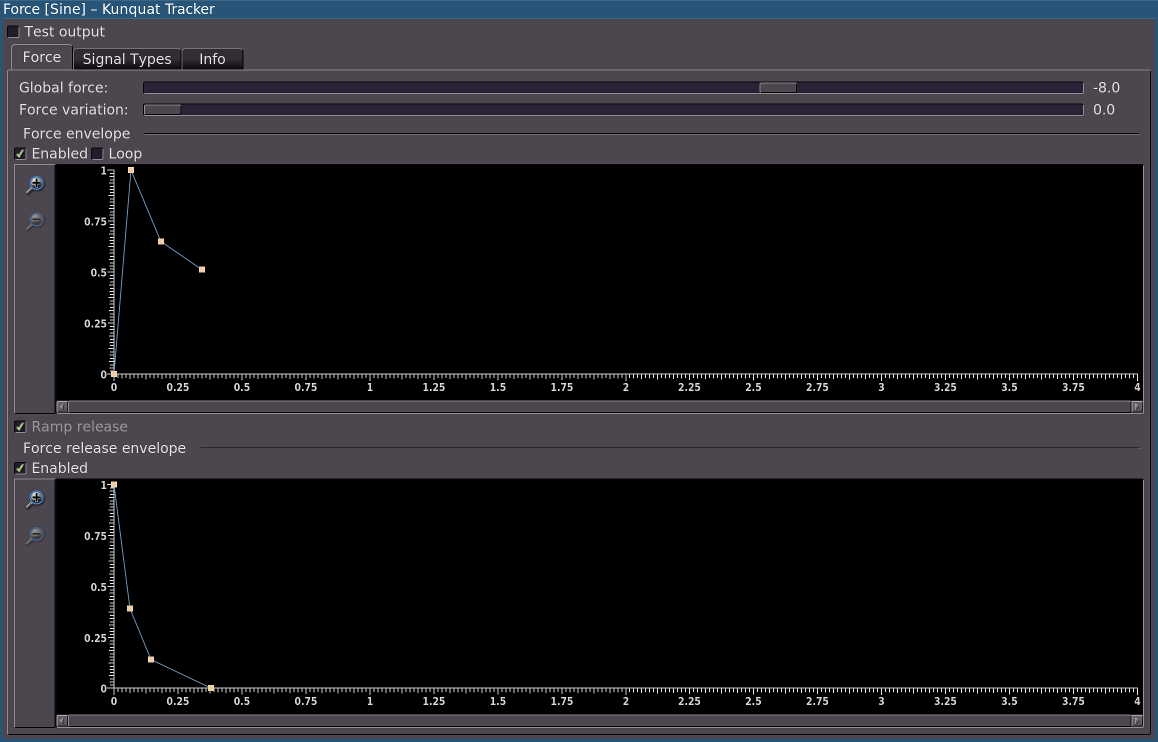
If you press the Edit button of the Force processor, you will find a number of controls for the force signal output. The Global force is the base control of force output, and you can use it to adjust the overall loudness of your instrument.
You can use the Force envelope to control how the force changes for each note over time. Tap the Enabled checkbox to enable the envelope. You can move envelope nodes by dragging with your mouse, create new nodes by clicking somewhere between existing nodes, and remove nodes by dragging them outside the envelope area (other than the right edge – that will simply give you more space to work with).
If you enable the Force release envelope, you can control how your note fades out when you release the key (or add a rest in the notation).
2.4. Additive synthesis
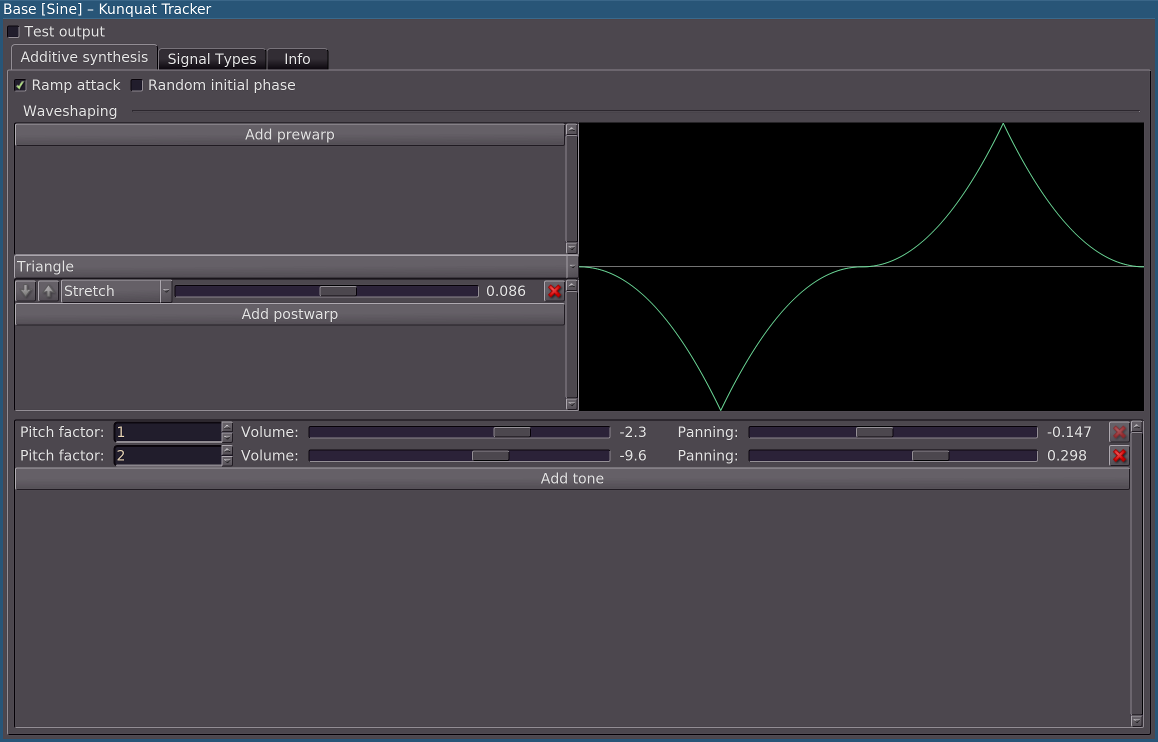
The Force processor allows you to add a bit of character to your instrument, but having the sine waveform as your base will not take you very far. Click the Edit button of the processor labelled “Base” to get some basic controls for timbre. The bottom of the editor contains basic controls for editing the overtone series of the sound. Next to the waveform display, however, you can change the base waveform to something other than sine wave.
2.5. Channel default instruments
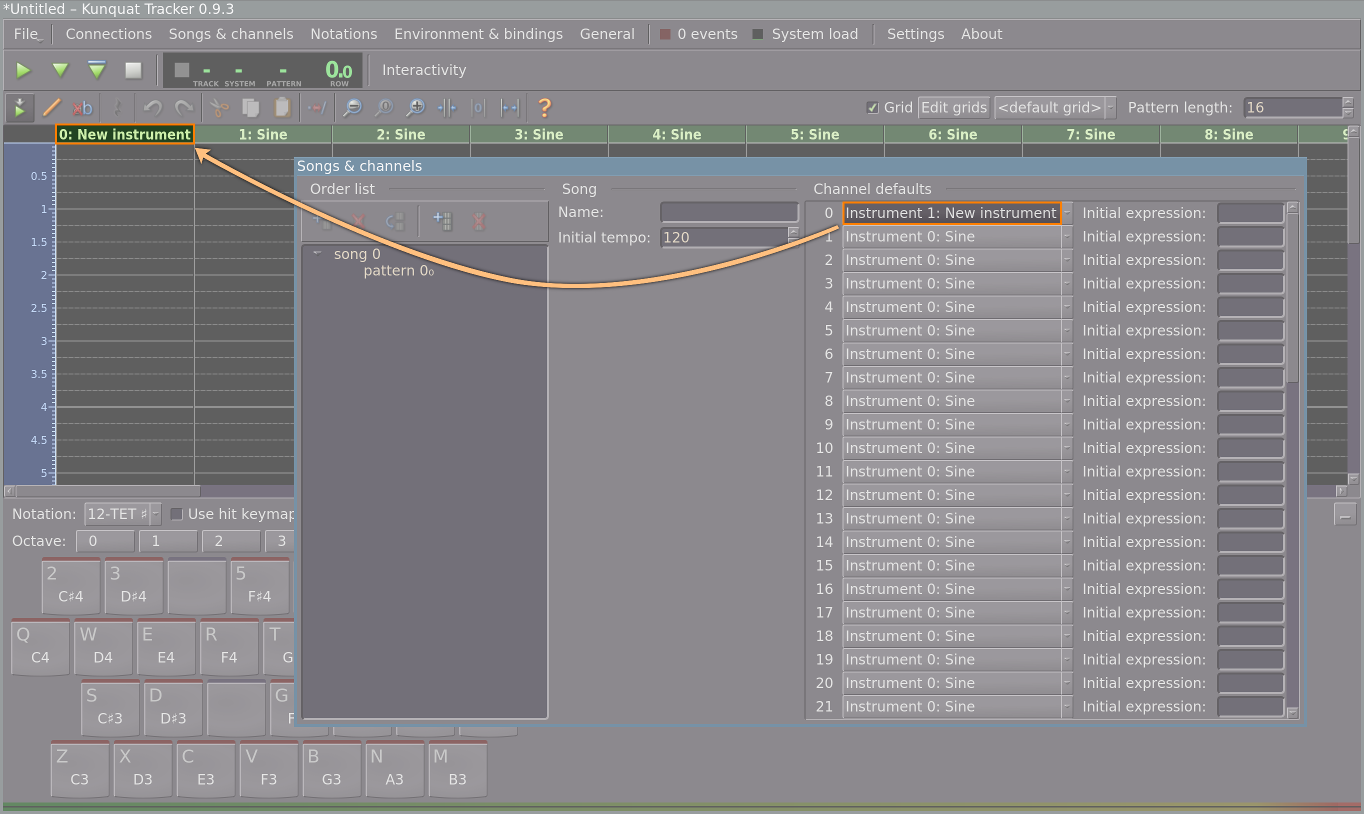
At this point you have a new instrument that you can play in the instrument editor, but it is not easily accessible in the composition sheet yet. Go to the Songs & channels window again and take a look at the Channel defaults section on the right. You can set the default instrument for each channel here. Once you change the default instrument in a channel, you can see that the corresponding column in the sheet editor displays the name of the default instrument in the column header.
3. Musical expression
Control of musical expression is the essence of Kunquat. In this section I will cover some of the basic concepts of event triggers and suggest some ways you can use them to make your music more expressive.
3.1. Force control and adding event triggers

Go to the sheet (pattern editor) and move your cursor to a
location immediately next to one of the notes you have
entered. Make sure you are in Edit
![]() mode. Press
Return to bring up a text field
where you can enter an event name. Try writing .f (note the
period, it is part of the event name). The .f event
allows you to set the force of the current note. After entering the
event name, you can enter the actual force value, which is
typically a number between 0 and 30 (default
“maximum” force).
mode. Press
Return to bring up a text field
where you can enter an event name. Try writing .f (note the
period, it is part of the event name). The .f event
allows you to set the force of the current note. After entering the
event name, you can enter the actual force value, which is
typically a number between 0 and 30 (default
“maximum” force).
The force value is in a logarithmic scale similar to decibels: reducing a force value by 6 lowers the amplitude of the note by half. However, note that, as an exception, the note force values in the sheet are shifted so that the default force is 30. Everywhere else in the tracker, force and volume parameters use a decibel scale where 0 is the default.

If you would like to change a force value of an existing trigger, enter
Replace ![]() mode, move
your cursor on top of the force trigger you want to modify, and press
Return.
mode, move
your cursor on top of the force trigger you want to modify, and press
Return.
3.2. Force and pitch slides
You can adjust the force of an existing note with the .f event anywhere between the note starting event and the next note or rest. However, this is usually not recommended, as the force change is instant and may cause an audible snap.
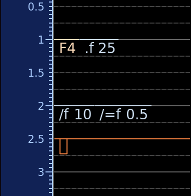
For smoother and more gradual changes in force, you need two additional events: /f and /=f. The /f event starts a force slide, and its parameter is the target force. The /=f event specifies the duration of the slide, and its parameter is the duration in beats. You need to specify both the target force and the slide duration; however, Kunquat remembers the duration you have previously specified in the column so you don't need to specify it every time unless you want to change it.
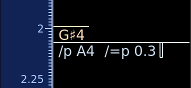
You can slide pitch in a similar way with the /p and
/=p events. Note that you can replace the target pitch of the
/p event in the Replace
![]() mode
directly by playing a new note while your cursor is on the event.
mode
directly by playing a new note while your cursor is on the event.
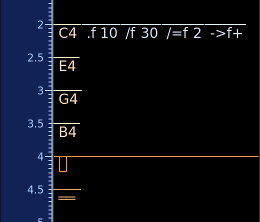
One example of a useful expressive device is portamento. Try the following pitch slide configuration in your melody line in a suitable spot. Experiment with different slide durations and starting points in the time axis.
3.3. Vibrato
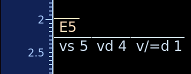
Another common expressive device, vibrato is controlled with the vs and vd events, which control the vibrato speed and depth, respectively. You probably also want to use the v/=d event, which specifies the transition duration for the vibrato depth similar to the slide duration events. (There is also v/=s, which you may find occasionally useful.) Turn the vibrato off by setting a depth of 0 with the vd event.
3.4. Force carrying
If you want to use the same force for a number of notes in succession inside a single channel, you don't need to use the same .f event with every note. Instead, you can use the ->f+ event to enable carrying of the previous note's force to the next note. This also works with force slides: with carrying enabled, you can make a force slide that spans multiple notes. To turn force carrying off, use the ->f- event.
4. More topics to be introduced later
This introductory documentation does not include all the topics I would like to cover yet, but I will extend it later. I hope that it helps you get started with the basics of Kunquat Tracker!